More evidence that low-calorie sweeteners are bad for your health
Studies show that artificial sweeteners can raise the risk of hypertension, metabolic syndrome, type 2 diabetes and heart disease, including stroke.
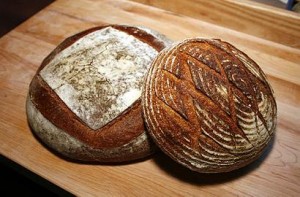
This is a delicious full-flavoured bread with a chewy crumb and thick crust made without added yeast.
Wild yeasts in the flour multiply to raise the dough and naturally-occurring beneficial lactic acid bacteria (which produce lactic, acetic and other acids) develop to give the bread its tangy flavour and make it more digestible.
The amounts given in the start-up section of this recipe may seem a bit over-precise, but beginning with relatively small quantities means that you don’t need to throw any of your leaven away (as is sometimes recommended by less waste-conscious methods). Digital scales that are sensitive to one gram are a great help. But absolute precision is not necessary.
Stage 1 – Starting a wheat sourdough from scratch
If you don’t already have a sourdough starter, you can get some from Bread Matters or from a baking friend.
It’s also easy to make your own.
Method
1 Take 40 grams (just over an ounce) of wholemeal flour and 40 ml (just over a fluid ounce) of warm water, mix them to a sloppy paste and put in a lidded plastic tub in a warm place (as near 30°C as you can manage).
2 Leave for 24 hours and then add another 40 g of flour and 40 ml of water. Stir well and return to the warm place.
3 Repeat on Day 3.
4 On Day 4 add 120g (4 oz) of white flour and 60 ml (2 oz) of warm water.
5 On Day 5 you should have a nicely fermenting, slightly fruit/acidic-smelling starter
Stage 2 – Making a ‘production leaven’
This process is known as ‘refreshment’.
To make one large or two small loaves you’ll need:
* If you are making the exact quantities in this recipe, you will have about 240 g of your original leaven left. This goes into a sealed pot in the fridge to wait for the next time you are making bread.
Method
1 This will give you 480g (16 oz) total ‘production leaven’.
2 Mix to a dough and leave in a warm place for 4 hours or in a cool place for 12 hours. Then use this leaven to make your dough.
Stage 3 – Making the final dough
Method
1 This will give you 1008g (around 2.2 lbs) total ‘final dough’.
2 Make a fairly soft dough. Knead until smooth and elastic.
3 Cut into the desired size, mould, into a round, dip in flour (brown rice flour is best) and place in a floured proving basket (known as a banneton) or a bowl lined with a floured linen cloth. Cover with a polythene bag and leave to prove in a warm place for up to 5 hours, until the dough has roughly doubled in volume.
4Turn out onto a baking sheet lined with silicone paper. Slash the dough with a sharp knife or razor blade to make the pattern of your choice.
5 Bake in a fairly hot oven (220°C dropping to 200°C after ten minutes) to develop a good crust.
Unused leaven may be stored in the fridge for some weeks. Leaven may also be frozen. To revive it, defrost it thoroughly and do a preliminary refreshment as described in ‘Stage 2’, but take care to work out how much you will need to make bread with at the dough stage and adjust the quantities back from there.
Recipe © Andrew Whitley 2013
Please subscribe me to your newsletter mailing list. I have read the
privacy statement